Fixing Loose Floorboards: A Simple Guide
Fixing loose floorboards is essential to maintaining a safe and stable home. Loose or creaky boards can not only be annoying but also pose a risk of injury or damage over time. In this guide, we’ll explore practical methods for fixing loose floorboards, keeping your floors secure, and restoring both comfort and durability to your space.
There is a specific kind of domestic frustration that comes with a “vocal” floor. You know the feeling: you’re trying to sneak to the kitchen for a midnight snack, only to have a single, traitorous floorboard announce your every move with a sharp, piercing creak. It isn’t just an annoyance; over time, loose floorboards can lead to tripped toes, damaged wood, and a house that feels older and more “tired” than it actually is.
The good news? You don’t need to be a master carpenter or own a truck full of industrial power tools to fix this. Most floorboard issues come down to simple physics—wood moves, fasteners loosen, and gaps form. With a little patience and a few hardware store basics, you can restore the quiet, solid foundation your home deserves.
Understanding the “Why”: Why Do Floorboards Get Loose?
Before you start drilling, it helps to understand what you’re up against. Wood is a “living” material. Even after it’s been cut, sanded, and polished into a floor, it continues to react to its environment.
- Seasonal Changes: In the summer, humidity makes wood expand. In the winter, dry heat from your furnace makes it shrink. This constant “breathing” eventually pulls nails loose from the joists.
- Settling: As a house settles into its foundation, the structural timber (the joists) can shift slightly, creating tiny gaps between the subfloor and the finish floor.
- The “Nail Rub”: Most squeaks aren’t actually the wood breaking; it’s the sound of a floorboard sliding up and down against a smooth nail that has lost its “bite.”
- High Traffic: Simply walking over the same spot for twenty years will eventually compress the wood fibers and loosen the fasteners.
The Essential Toolkit for Quiet Floors
You don’t need much, but having the right versions of these tools makes the difference between a professional-looking repair and a messy one.
- A Power Drill/Driver: You’ll need this for pre-drilling pilot holes (essential to prevent splitting) and driving screws.
- Trim Head Screws: This is the most important item. Unlike standard screws with wide heads, trim head screws (often called “lost head” screws) have tiny, square-drive heads. They are designed to sink deep into the wood so they can be easily hidden.
- A Stud Finder: To find the joists beneath the floor.
- Wood Filler or Putty: Look for a “stainable” version or one that closely matches your floor’s finish (oak, pine, walnut, etc.).
- A Hammer and Nail Set: If you have old nails sticking up, you don’t want to pull them out; you want to drive them deeper.
- Painter’s Tape: To mark your “trouble spots” without leaving residue on your finish.
Step 1: The “Zombies and Tape” Walk-Through
The first step is a bit of detective work. Walk across the room slowly—if you have a partner, have them walk while you stay low to the ground to watch for movement.
- Mark the Movement: Every time you hear a squeak or feel a board “give” under your weight, put a piece of painter’s tape on it.
- Identify the Type of Sound: A sharp, high-pitched squeak usually means two boards are rubbing together. A dull “thud” or a “springy” feeling usually means the board has lifted off the joist entirely.
Step 2: Mapping the Joists
Your floorboards aren’t just floating; they are nailed into heavy timber beams called joists. To fix a loose board, you must anchor it back into these joists. If you just screw a board into the thin subfloor, it won’t hold for long.
- Follow the Nail Line: Look closely at your floor. You’ll see tiny circles where the original nails were driven. These nails always run in straight lines across the room. Those lines represent your joists.
- Use the Stud Finder: If your floors are thick or the nails are well-hidden, a stud finder on “Deep Scan” mode can help you find the center of the timber beam.
- The Tap Test: If you tap the floor with a hammer, a “hollow” sound means you’re between joists. A “solid” thud means you’ve found your target.
Step 3: Drilling the Pilot Hole (The “No-Splitting” Rule)
This is where many DIYers go wrong. If you drive a screw directly into an old, dry floorboard, the wood will almost certainly split along the grain.
- Size Matters: Select a drill bit that is slightly thinner than the shank of your screw.
- The Angle: Drill straight down through the floorboard and about a half-inch into the joist below.
- Safety Check: Be mindful of where you are in the house. If you are directly above a bathroom or kitchen, remember that water pipes and electrical wires often run through the center of joists. Don’t use 4-inch screws when 2-inch screws will do the job.
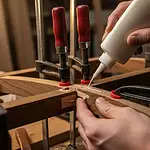
Step 4: Fixing Loose Floorboards: Securing the Board with Trim Screwsfixing loose floorboards
Now, it’s time to close the gap.
- Why Screws? Nails are smooth. As the wood moves, the nail acts like a slide. Screws have threads that act like an anchor. Once a screw is in, that board isn’t going anywhere.
- The Method: Drive the trim head screw into your pilot hole. As the head of the screw hits the wood, keep going until it “countersinks” (sinks about 2–3mm below the surface).
- The Pull-Down: You should actually see the floorboard being pulled tight against the joist as the screw tightens. If the board doesn’t move, you might have missed the joist.
Step 5: Hiding the Evidence
Now that the floor is silent, you want to make sure it still looks beautiful.
- Fill the Hole: Take a small amount of wood putty on your finger and press it into the hole left by the screw head. Wipe away the excess with a damp cloth immediately.
- Match the Grain: If you have a variegated wood like Oak, you might want to use two different shades of putty to mimic the natural grain.
- Old Nails: If old nails are sticking up, don’t pull them out (this leaves a huge hole). Use a nail set—a small metal tool—to tap the nail head back down below the surface, then fill that hole too.
Fixing Loose Floorboards: Troubleshooting Common Problems
“I have carpet, and I don’t want to rip it up.”
You can actually fix squeaky floors through the carpet. There are specialized kits (like “Squeeeeek No More”) that feature screws with heads that snap off once they reach a certain depth. You drive them through the carpet fibers; the screw anchors the floor, and the head snaps off below the carpet backing, leaving the repair invisible.
“The boards are rubbing against each other, not the joist.”
Sometimes the squeak is caused by two boards grinding against one another like tectonic plates.
- The Lubricant Fix: Before reaching for the drill, try “lubricating” the joint. Sprinkle a little bit of talcum powder or powdered graphite into the cracks between the boards. Walk on it to work the powder down. This reduces friction and can often silence a minor squeak instantly.
“The floor feels ‘bouncy’ over a large area.”
If an entire section of your living room feels like a trampoline, the problem isn’t the floorboards—it’s the subfloor or the joists themselves.
- The Under-Floor Fix: If you have access to a crawlspace or basement, go underneath while someone walks above. You might see a joist that has warped or “bridging” that has come loose. You can often fix this by wedging a thin wood shim (coated in wood glue) between the joist and the subfloor.
Fixing Loose Floorboards: How to Keep Your Floors Quiet
Once you’ve performed your “search and destroy” mission on those squeaks, a little maintenance goes a long way.
- Monitor Humidity: Wood is happiest at about 40–50% humidity. If your house gets bone-dry in the winter, buy a humidifier. It keeps the wood from shrinking and prevents new squeaks from developing.
- Rug Placement: In high-traffic areas (like hallways), a rug with a thick pad doesn’t just look good—it absorbs the impact of your footsteps, reducing the mechanical stress on the floorboards.
- Tighten Early: Don’t wait until the whole room is squeaking. If you notice a board starting to “pop,” spend five minutes fixing it now before it pulls its neighbors loose.
Conclusion
A squeaky floor is often just a house’s way of asking for a little bit of attention. Check my guide. By switching from nails to screws and taking the time to find the joists, you can transform a noisy, distracting room into a solid, high-quality space. It’s one of the most satisfying DIY projects because the results are immediate—you can hear the difference the moment you step back.
Your toilet is the workhorse of your home. A little bit of preventative maintenance—like checking the flapper once a year—can save you from a lot of stress. Would you like me to schedule a quick diagnostic call or provide a free estimate for your toilet repair? Contact Handyman Home Doctor today for the best bathroom plumbing repair in town!
Related Posts


