How to Repair Baseboards and Trim (Step-by-Step DIY Guide)
- admin
- repairing baseboards and trim
- 0 Comments
Let’s be honest: baseboards are the unsung heroes of your home. They take the hits from vacuum cleaners, endure the “enthusiasm” of pets, and somehow still manage to make a room look finished.
But when they start showing baseboard cracks, unsightly gaps, or those inevitable chipped baseboards, that polished look starts to fade.
The good news? You don’t need to call in a construction crew for every ding and dent. Most baseboard repair DIY projects are surprisingly satisfying and budget-friendly.
Whether you’re prepping for a sale or just tired of looking at that one wonky corner, this trim repair guide will help you get those lines looking sharp again.
Repair vs. Replace: When to Let Go
Before you break out the toolkit, do a quick “health check” on your wood.
- The Quick Fix: If you’re dealing with nail holes, small dents, or caulking gaps, a little TLC goes a long way. Repairing baseboards and trim is usually just about filling and painting.
- The Full Swap: If the wood feels soft, crumbly, or shows signs of moisture damage (common in bathrooms), it’s time for a fresh baseboard installation. Trying to paint over rot is like putting a band-aid on a leaky pipe—it won’t end well.
Your DIY Toolkit
You likely have half of this in your garage already:
- Wood filler (the stainable kind is great, but paintable is fine too)
- Paintable caulk (look for “Siliconized Acrylic”)
- Sanding blocks (a medium 120-grit and a fine 220-grit)
- A flexible putty knife
- Adhesive and glue (for those stubborn corner joints)
- Matching trim paint and a high-quality brush
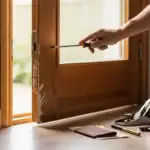
Step 1: Prep and Stabilize
You can’t build on a shaky foundation. Start by cleaning the trim to remove dust and floor wax. If the trim is pulling away from the wall, use a finish nail to snug it back into place.
If you notice the trim alignment is slightly off at the corners, a dab of adhesive and glue before nailing can keep those miters tight for years.
Step 2: Healing the Scars (Filling and Sanding)
This is where the magic happens. Repairing wall trim is all about hiding the hardware.
- Nail Holes & Cracks: Use your putty knife to press wood filler into holes and baseboard cracks. Don’t be afraid to overfill just a tiny bit; filler tends to shrink as the moisture evaporates.
- Sanding Baseboards: Once it’s bone-dry, sand it down with your 220-grit block. Run your hand over it—if you can feel the bump, you’ll see the bump. Aim for a surface so smooth it feels like part of the wood.
Step 3: Closing the “The Gap”
Almost every home has a gap between the wall and trim. It’s usually just the house “breathing” or settling. How to fix baseboard gaps like a pro: Run a thin, steady bead of caulk along the top edge. Wet your finger and smooth it out in one long motion. This doesn’t just look better; it keeps dust and spiders from moving into your walls.
Step 4: Reshaping Chipped Corners
Corners take the most abuse. If a chunk is missing, you can “reconstruct” it. Apply a thicker layer of wood putty or epoxy, rough-shape it to match the trim molding profile, and let it cure.
Then, use your sandpaper to “sculpt” the corner back to life. This is one of the best wood trim repair tips for making old trim look brand new.
Step 5: The Finishing Touch
Now for the rewarding part: repainting trim.
- Prime first: Any area where you used filler needs a quick coat of primer so the paint sticks evenly.
- Paint Touch-Up: Use a “semi-gloss” or “gloss” finish. These are easier to wipe down later when the vacuum hits them again.
- Seal it up: Ensure your finishing and sealing covers the caulk line to prevent it from yellowing or collecting dust over time.
Pro Tip: The Moisture Factor
If you find yourself constantly fixing chipped baseboards or dealing with peeling paint near the floor, check for moisture.
Wood is a sponge; if your floors are being mopped with too much water or there’s a hidden leak, the wood will expand and fail. Keep things dry, and your repairs will last a lifetime.
Does this feel like a weekend project you’re ready to tackle?
Sometimes, life gets busy, or the damage is just too extensive for a putty knife. If you’re looking at a whole house of wonky trim or need professional baseboard installation, Handyman Home Doctor has the tools to do the heavy lifting for you.